Mellau Consulting
Lineshapes
|
The Symath SpectrumFit program accepts any analytical function as lineshape. For each SpectrumDatabase a number of lineshapes can be defined which in turn can be used for each peak as lineshape. The lineshapes selected for a spectrum are shown in the section "Lineshape set up" of the SymathWorkSheet where also some additional attributes as default parameter values, parameter minimum-maximum values can be defined. To make the input of the lineshapes user-friendly as possible Symath allows the set up of a Lineshape Database. A lineshape once defined can be reused any time very easy with only a mouse click. LineshapeDatabases are files in which a number of lineshape formulas are predefined with some additional information as lineshape name, derivative formulas, number of parameters, parameter description etc... . Once a lineshape is set up, it can be saved in a LineshapeDatabase. With a single mouse click the user can add such a predefined lineshape to its spectrum and use it as lineshape in the spectrum analysis. You can define any number of LineshapeDatabases so that you can sort your lineshapes after instrument, spectroscopic technique etc... In this section you will learn how to define a lineshape with all its attributes as lineshape formula, lineshape name, lineshape parameter descriptions, guess formulas etc... and how to save the new lineshape in a database. You will also learn how to transfer a lineshape from a LineshapeDatabase into a *.pek SpectrumDatabase. The lineshapes formula with all additional information (as derivative formulas, parameter user defined names etc... ) is saved in the Symath SpectrumDatabase. If you load a *.pek database for analysis you will work with the lineshape formulas that are saved IN the *.pek database and NOT the original formulas that are defined in the LineshapeDatabase. This is the basic concept used in all Symath programs : In the same database we have stored the measured data ( spectrum x-y data points ), the analysis results ( peaklist with lineshape parameters ) AND the model used for analysis of the data ( lineshape ). To use a lineshape for the analysis of a spectrum you have first to load and select a LineshapeDatabase. LineshapeDatabases can be loaded or edited in the section named "LineshapeDatabase" of the SpectrumFit SymathWorkSheet. Symath SpectrumFit program has a default LineshapeDatabase file which is automatically loaded every time you start the SpectrumFit program. The default LineshapeDatabase contains always only a few lineshapes. In the Lineshapes directory you can find some additional LineshapeDatabases. If you have some lineshapes that you use very often you can add these lineshapes to the default LineshapeDatabase - you can benefit on the automatic reload feature of this LineshapeDatabase and have the most frequently used lineshapes ready to use for each new WorkSheet. If you add new lineshapes to the DefaultLineshape database you must backup this before a program update. The FileList table shown in the Figure 1 displays the list of loaded LineshapeDatabases after the start of Symath SpectrumFit program.
Figure 1. The the list of LineshapeDatabases where the default database is loaded. If more than one LineshapeDatabase is loaded, they are all displayed in the FileList table. To insert a new lineshape in a *.pek SpectrumDatabase from a LineshapeDatabase or to create a new lineshape for a SpectrumDatabase you have to select one of the LineshapeDatabases as shown in the figure 4.2 . The numbering button of the selected LineshapeDatabase will change to light red or dark red.
Figure 2. The FileList table of LineshapeDatabases with one loaded and selected database. After the selection of one or more LineshapeDatabase the user can execute three major tasks : One is the transfer of the lineshape formulas form the LineshapeDatabase in the SpectrumDatabase file i.e. to add a lineshape to the spectrum. The second major task is the creation of a new lineshape or edition of an already present lineshape. The third major task is the transfer of a lineshape from one LineshapeDatabase to another one. For all these tasks an additional window called "LineshapeWindow" is created. On this window a table with the currently defined lineshapes from all selected LineshapeDatabases is shown. Figure 3 shows such a table called "LineshapeSelection" table with the lineshapes of a single selected LineshapeDatabase containing two lineshapes. Figure 3. The LineshapeSelection table with the list of lineshapes defined in the selected LineshapeDatabase Figure 4. The LineshapeList table with the list of lineshapes defined for the SpectrumDatabase. Now you can transfer a lineshape from the LineshapeDatabase in the *.pek SpectrumDatabase. The lineshapes defined for a *.pek SpectrumDatabase are shown
on the LineshapeList table of the SymathWorkSheet as shown on the figure 4 . Each row of this table stays for a lineshape, each lineshape is shown through its formula or symbol. Clicking the
Figure 5. The LineshapeSelection table just after the Add button in the second row was clicked.
Figure 6.The updated LineshapeList table with the new lineshape after the Add button in the LineshapeSelection table was clicked. The lineshape for which you clicked the
Figure 7. The LineshapeSelection table after the New button of the second row was clicked. After you clicked the Figure 8.LineshapeEditor 1st table in the section "Lineshape type set up". The second section is named "Lineshape formula set up", here you can define the formula of the lineshape. Here is the central feature of this program : you simply edit on the input field your lineshape - as complex you wish. Mathematica (and in some sense Symath) will care to execute independent on your input all procedures described in this manual with your lineshape and NOT with one of - equal how many- predefined ones. In this sense Symath is the single interactive program that can do this task for you. The table displayed in this section is shown on the figure 9 . Figure 9. Lineshape Editor 2nd table in the section "Lineshape type set up". . The formula can use ANY mathematical functions implemented in Mathematica. The parameter symbols that you have to use in the formula are predefined, they
must be xz,s,b[[1]],b[[2]],... a[[1]],a[[2]]... As you can see two of them xz and s are special they must be always used in a lineshape formula. xz determines the
position of the peak on the x axis and s its strength. b[[i]] are the symbols used for all other parameters as the linewidth. For lineshape identification you can define
for each lineshape a name and a function symbol. For lineshapes with simple analytical form you can use the lineshape formula as symbol ( as done in all examples
shown in this manual ). For complicated, long formulas the use of the formula as symbol would be unpractical so that in this case you can define an additional
symbolic function form which will be used as display form for the lineshape. To use this second mode you have to click the button
Figure 10. Lineshape Editor 2nd table in the section "Lineshape type set up" with different lineshape formula and lineshape symbol definition mode switched On. The third section is named "b[[i]] type parameters set up", here you can define for each b type parameter a name and symbol form. In version 1.0.1 this information can be used only to label the peaks. The table displayed in this section is shown on the figure 11 . Figure 11.Lineshape Editor 3th table in the section "b[[i]] type parameters set up". The fourth section is named "a[[i]] type parameters set up", here you can define for each a type parameter a name and symbol form. In version 1.0.1 this information can be used only to label the peaks. The table displayed in this section is shown on the figure 12 . Figure 12. Lineshape Editor 4th table in the section "a[[i]] type parameters set up". The fifth section is named "Derivatives set up", here you can define the derivative formulas for each parameter. This section can be switched between two different modes. The default mode is where Symath will calculate using Mathematica D[] function the derivatives automatically for each lineshape. In this case the table shown on the figure 13 will display for you only the results of these calculations where you can verify if these are OK. Figure 13. Lineshape Editor 5th table in the section "Derivatives set up". In the second mode Symath will allow you to type for each derivative a formula. This formula will be used in the fit procedure. You can use this mode if Mathematica cant calculate the derivatives. The table will be as shown on the figure 14 with an input field set to default value of 1.0 for each parameter. Symath will display for you also the system form of the formulas you entered in the input fields. If you want to give the derivative formulas yourself you MUST make sure that these are correct else none of the fit procedures will work.
Figure 14. Lineshape Editor 5th table in the section "Derivatives set up" in the mode where the user can define the derivative formulas. The sixth section is named "PeakSearch system guess functions set up", here you can define the estimating functions for the search system. The table displayed in this section is shown on the figure 15 where for each parameter an estimating function can be defined. You can learn more about the estimating functions in the SearchSystem section of this manual. The SearchSystem is based on a complex search algorithm that goes through the spectrum and searches for some specific data positions in the spectrum as for maxima, minima zero crossings of the spectrum etc... . If such a data point was found Symath will insert a new peak in the spectrum using the current selected lineshape. The new lineshape should be inserted not only with some default values but with the best parameter estimates of the peak parameters using the (x,y) position of the maximum data point found in the search procedure. The problem is that Symath is general : the lineshape can be anything and so there is no general information how to calculate using the data points (x,y) coordinates the parameter estimates. To solve this problem Symath allows you to define for each lineshape and each SearchSystem type a parameter estimating function. This function will then be used for each detected peak to calculate the peak parameters using the data returned by the SearchSystem. The symbols for each data item returned by the SearchSystem is predefined. As an example consider the search modus in which the SearchSystem founds the maxima of the spectrum. The SearchSystem type can be selected using the first button of the table. The second row contains the predefined parameter symbol description of the data items that is available for each new peak found, in this case the maximum x and y coordinate. If we use as lineshape a gaussian function with a normalized intensity parameter ( peak area ) than Symath has to calculate for each peak the peak area using the peak maximum y coordinate. The formula to calculate the peak area using the peak maximum at the peak x axis center position contains also the peak width parameter which is unknown for the search routine. In the estimating functions we can define not only the parameter symbols listed in the second row of the table but all b and a type parameters. In this case the default values will be used, these values can be edited for each SpectrumDatabase on the LineshapeList table. If we set this parameter to the average peak width of the peaks in the spectrum we will obtain with the estimating functions shown in the table an acceptable estimation of the peak intensity parameter. A very interesting aspect of the search system is that various search routines can be implemented for specific features in a spectrum which can return any number of parameters and these specific search system than can be adapted to any lineshape without any change in the program structure itself. Figure 15. Lineshape Editor 6th table in the section "PeakSearch system guess functions set up".
Buttons and table header elements of the "LineshapeDatabase Load/Save" section To insert a lineshape in the *.pek SpectrumDatabase you have first to load your LineshapeDatabase file. To create a new lineshape you have first to load a LineshapeDatabase in which the new lineshape will be stored. You can load any number of LineshapeDatabase files. The loaded files are displayed in a FileList table as shown on the next figure.
The following section lists all table header elements and buttons of the section where you can load/save LineshapeDatabases. A brief description of the LineshapeDatabase loading/save process can be found in the How it works section of this chapter.
Click this button to select a LineshapeDatabase. If you select a LineshapeDatabase, a LineshapeEditor window will be created. Here all the lineshapes defined in the database are listed in the LineshapeSelection table. You can select multiple LineshapeDatabases, in the LineshapeEditor window all lineshapes defined in each selected LineshapeDatabase will be listed. As long you are analyzing a *.pek SpectrumDatabase with already selected lineshapes you will not need to load and select a LineshapeDatabase, all the information necessary to work with the lineshapes used within the *.pek SpectrumDatabase are stored in the SpectrumDatabase itself.
In this column the File format type of the LineshapeDatabase is shown. At present version 1.0.2 only the standard *.lsp type LineshapeDatabases are implemented. In future versions of Symath other LineshapeDatabase formats can be defined with additional application specific information.
In this column of the FileList table the number of lineshapes defined in the LineshapeDatabase is shown.
In this column the directory of the LineshapeDatabase is shown.
In this column the file name of the LineshapeDatabase is shown. With the processing buttons shown just after the LineshapeDatabase FileList table you can load a LineshapeDatabase and you can save an edited LineshapeDatabase. To create a new LineshapeDatabase rename one of the shipped LineshapeDatabases ( as the default LineshapeDatabase named Default2.lsp ) and edit its content. The processing buttons for this section are as shown on the next figure. The following section lists all table header elements and buttons of the section where you can load/save LineshapeDatabases. A brief description of the LineshapeDatabase loading/save process can be found in the How it works section of this chapter.
Click this button to load a LineshapeDatabase from the computer file system. A LineshapeDatabase is a database of analytical functions and additional attributes that can be used in SpectrumFit as lineshape functions. After you clicked this button a FileSelection window will be displayed on the screen where you can browse for the file name and directory of the LineshapeDatabase that you want to load.
Click this button to save the selected *.lsp LineshapeDatabases on the computer disk. All selected LineshapeDatabases will be saved on the disk one after another as they are listed in the LineshapeDatabase FileList table.
Forces the load of *.lsp database if minor errors are reported. If the database is not corrupted but only some unevaluated expressions are present in the database Symath will not load the LineshapeDatabase. In such cases you will get an error message and Symath will stop the loading procedure. Than you have to can click this button and retry the loading procedure. If the database is corrupted and you force the loading of the LineshapeDatabase using this button Symath can crash, so before using this button make sure that your current analysis data is saved.
Click this button to display a help table about the Lineshape Database system. Symath will display in the current WorkingSheet a table where all table header elements and buttons are explained. Glossary for the buttons of the "LineshapeWindow" main section. The general processing buttons for the LineshapeWindow are displayed on the top of the LineshapeWindow as shown on the next figure. The following section explains the LineshapeWindow general processing buttons. The ImplementedLineshapes section, the LineshapeSelection section and the LineshapeEditor sections have separate help tables. A brief description of the data lineshape selection process and lineshape definition process can be found in the How it works section of the manual.
Click this button to increase the font size in all LineshapeWindow tables. This will increase also the size of the table. If you are editing complicated tables you will found this feature very useful. There is an optimal setting of the fontsize parameter in which case these tables are the most easy to edit.
Click this button to decrease the font size in all LineshapeWindow tables. This will decrease also the size of the table. If you are editing complicated tables you will found this feature very useful. There is an optimal setting of the fontsize parameter in which case these tables are the most easy to edit.
Click this button to make the current LineshapeWindow the active one. This button works in the case that you created more than one LineshapeWindow. You can have as many LineshapeWindows as you wish. You can display for example on a LineshapeWindow a lineshape with all its attributes and edit on another window a new one, you can use in this Cut and Paste between the two windows. Always, after you created a new LineshapeWindow window all other such window will be inactive and cant be used for editing, only the last one created one will be active. If you click this button of an inactive window the corresponding window will become active and all other ones will be inactive.
Click this button to display a help table for the LineshapeWindow. For all specific sections of the LineshapeWindow additional help tables can be switched On/Off. Glossary for the buttons and table header elements of the "List of user defined lineshapes" section The lineshapes of the selected LineshapeDatabases are displayed in the LineshapeSelection table on the LineshapeEditor window as shown on the next figure.
The following section explains the header elements and buttons for the LineshapeSelection table. A brief description of the selection of a lineshape for a spectrum and the definition of new lineshapes can be found in the How it works section of this chapter.
Counting number of the lineshapes in the LineshapeSelection table. All lineshapes of all selected LineshapeDatabases are shown in the table, the numbering begins with the first lineshape of the first database and goes through all lineshapes of the first LineshapeDatabase, than continues with the first lineshape of the second LineshapeDatabase etc.... The last number in this column is the total number of lineshapes of all selected LineshapeDatabases.
Button to insert a lineshape in the selected *.pek SpectrumDatabase. Each lineshape has an Add button. If you click with the mouse the Add button the corresponding lineshape is inserted in the *.pek SpectrumDatabase. Just after the lineshape was inserted in the *.pek SpectrumDatabase file the selected row will be highlighted in dark red color to signalize to the user that the lineshape was inserted.
In this column the user defined name of the lineshape is shown. The user can change this text by clicking the Edit button
In this column the user defined lineshape formula or the symbol of the lineshape is shown. This is just the analytical formula of the lineshape or fore complex formulas where the formula is too big to be used as button a symbolic text. The user can change the formula or symbolic text by clicking the Edit button
In this column the dimension of the lineshape, the number of independent parameters in the lineshape formula is shown. This parameter is calculated automatically by SpectrumFit after you terminated with the input of the lineshape formula. The user can change this parameter only through editing the lineshape formula.
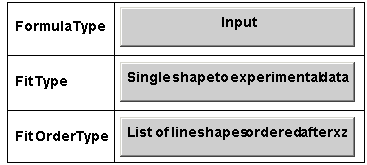
The Symath SpectrumFit version 1.0.1 lineshapes can be of 2 major types : Input -i.e. user defined and Implemented -i.e. programmed in the SpectrumFit. For further version of Symath SpectrumFit other lineshape types can be implemented for special applications which will have they own type. Before doing any calculation in any processing function Symath will check for this setting. The user can change the lineshape type text by clicking the Edit button
In this column the LineshapeDatabase in which the lineshape is saved is drawn on the table. As already mentioned if you select more than 1 LineshapeDatabase all lineshapes from all selected databases are drawn on this table. In this column you can identify for each lineshape to which LineshapeDatabase file it corresponds.
Click this button to Edit the lineshape formula, name etc... . Each row (each lineshape) has an Edit button. If you click the Edit button of a given row, you can edit the lineshape corresponding to the given row.
Click this button to delete the lineshape from the LineshapeDatabase. Each row (each lineshape) has a Delete button. If you click the Delete button of a given row, you can delete the lineshape corresponding to the given row.
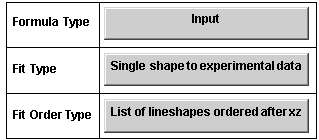
Click this button to insert a new default lineshape in the LineshapeDatabase. Each row (each lineshape) has a New button. If you click the New button of a given row, the lineshape corresponding to the given row will be used as default for the new lineshape. The new lineshape will be added always as the last lineshape of the last selected LineshapeDatabase. As mentioned lineshapes from different database files can be displayed on this table, so with the help of the New button you can copy a lineshape from one LineshapeDatabase file into another. Also you can easy create a new lineshape from an existent one by simply creating a new copy of the existent one and editing the already given formulas to the new ones. Glossary for the buttons and table header elements of the "Lineshape type set up"section of the LineshapeEditor system You can select a lineshape for edit in the LineshapeSelection table. The selected lineshape with all its attributes will be shown on 6 sections named LineshapeEditorTables of the LineshapeWindow. In the first table named Lineshape type set up you can set up the lineshape type as shown on the next figure.
The following section explains the header elements and buttons for the Lineshape formula set up section of LineshapeEditor. A brief description of the definition of new lineshapes can be found in the How it works section of this chapter.
Click this button to change the type of the lineshape. Changing this button you can switch to more complicated lineshape definition modes for complicated lineshapes. This button is implemented already in version 1.0.2 but only the default lineshape type is functional. In further versions other lineshape definition modes will be implemented as for example the use of a convolution of two or more different user defined functions as a lineshape.
Click this button to change the fit modus type of the lineshape. This button is implemented already in version 1.0.2 but only the default fit modus is functional. In further versions other fit modus definition modes will be implemented as the use of a fit parameter n which will count the number of peaks in the fit.
Click this button to change the fit order type of the lineshape. This button is implemented already in version 1.0.2 but only the default fit modus is functional in which the peaks must be ordered after the xz peakposition parameter. In further versions other fit order types will be defined. Glossary for the buttons and table header elements of the "Lineshape type set up"section of the LineshapeEditor system You can select a lineshape for edit in the LineshapeSelection table. The selected lineshape with all its attributes will be shown on 6 sections named LineshapeEditorTables of the LineshapeWindow. In the first table named Lineshape type set up you can set up the lineshape type as shown on the next figure.
The following section explains the header elements and buttons for the Lineshape type set up section of LineshapeEditor. A brief description about definition of new lineshapes can be found in the How it works section of this chapter.
Click this button to change the type of the lineshape. Changing this button you can switch to more complicated lineshape definition modes for complicated lineshapes. This button is implemented already in version 1.0.2 but only the default lineshape type is functional. In further versions other lineshape definition modes will be implemented as for example the use of a convolution of two or more different user defined functions as a lineshape.
Click this button to change the fit modus type of the lineshape. This button is implemented already in version 1.0.2 but only the default fit modus is functional. In further versions other fit modus definition modes will be implemented as the use of a fit parameter n which will count the number of peaks in the fit.
Click this button to change the fit order type of the lineshape. This button is implemented already in version 1.0.2 but only the default fit modus is functional in which the peaks must be ordered after the xz peakposition parameter. In further versions other fit order types will be defined. Glossary for the buttons and table header elements of the "Lineshape formula set up"section of the LineshapeEditor system In the section of the LineshapeEditor named Lineshape formula set up you can set up the lineshape formula, symbol and name as shown on the next figure.
The following section explains the header elements and buttons for the Lineshape formula set up section of LineshapeEditor. A brief description of the definition of new lineshapes can be found in the How it works section of this chapter.
In this row the dimension, i.e. the number of independent parameters of the lineshape formula is shown. This parameter is automatically calculated after each lineshape formula change. This parameter is informative and you should check if it is correct.
In this row the formula symbol or lineshape formula is shown depending on the status of the switch button of the next row. If the switch button is in the status "Yes, Use Formula Symbol as function" the formula that you type in this input field will be used as symbolic text to identify this lineshape and also is interpreted as a mathematical function to be used as lineshape formula itself. If the switch button is in the status "NO, formula symbol is used ONLY as symbol" the lineshape function is given in the next row and the formula that you type in this input field will be used only as a symbolic text to identify this lineshape.
In this row a switch button is shown which defines if the lineshape symbol and lineshape formula are the same expression. If the switch button is in the status "Yes, Use Formula Symbol as function" the formula that you type as lineshape will be used also as symbolic text to identify this lineshape and also is interpreted as a mathematical function to be used as lineshape formula itself. If this switch button is in the status "NO, formula symbol is used ONLY as symbol" the lineshape function is given in the next row. The formula that you type in this input field will be used only as a symbolic text to identify this lineshape. The formula i.e. the mathematical function to be used as lineshape can be given in this case in an additional input field shown in the next row of table.
If the switch button is in the status "NO, formula symbol is used ONLY as symbol", you can give here the lineshape formula i.e. the mathematical function to be used as lineshape. This button is drawn on the table only if the switch button is in this status.
After you type your lineshape formula in the input field, Mathematica has to interpret - convert - this textual input to a form which can be used in a calculation. In this row the form of the lineshape is drawn exactly how it was interpreted and how it will be used in further calculations. This row is informative and you should check if it is correct.
On this input field you can give a name for your lineshape. This name will be used in Symath to identify your lineshape.
In this row the dimension of xz,s,b type parameters, i.e. the number of all independent lineshape parameters which are defined for each peak as a separate parameter is shown. This parameter is automatically calculated after each lineshape formula change. This parameter is informative and you should check if it is correct.
In this row the dimension of a type parameters, i.e. the number of independent a type parameters of the lineshape formula is shown. This parameter is automatically calculated after each lineshape formula change. This parameter is informative and you should check if it is correct.
In this row the dimension of b type parameters, i.e. the number of independent b type parameters of the lineshape formula is shown. This parameter is automatically calculated after each lineshape formula change. This parameter is informative and you should check if it is correct.
If in the user defined lineshape the xz parameter was found True is displayed in this row, else False. In the current version of Symath the xz parameter MUST be present in all lineshapes even as a dummy parameter. This parameter is automatically calculated after each lineshape formula change. This parameter is informative and you should check if it is correct.
If in the user defined lineshape the s parameter was found True is displayed in this row, else False. This parameter is automatically calculated after each lineshape formula change. This parameter is informative and you should check if it is correct.
If in the user defined lineshape the n parameter was found True is displayed in this row, else False. The n parameter will be functional only in further Symath versions, please don't use it as parameter. This parameter is automatically calculated after each lineshape formula change. This parameter is informative and you should check if it is correct.
"b[[i]] type parameters set up"section of the LineshapeEditor system In the section of the LineshapeEditor window named b[[i]] type parameters set up you can set up for each b type parameter of the lineshape a name and symbol as shown on the next figure.
The following section explains the header elements and buttons for the b[[i]] type parameters set up section of LineshapeEditor. A brief description of the definition of new lineshapes can be found in the How it works section of this chapter.
Edit on this input field the name of the lineshape b[[i]] parameter. This name will be used for other tables as headers and can be used on the PlotWindow to label the peaks.
Edit on this input field the name of the lineshape b[[i]] parameter symbol. This symbol can be used for other user defined formulas or for the PlotWindow to label the peaks. Glossary for the buttons and table header elements of the "a[[i]] type parameters set up"section of the LineshapeEditor system In the section of the LineshapeEditor window named a[[i]] type parameters set up you can set up for each a type parameter of the lineshape a name and symbol as shown on the next figure.
The following section explains the header elements and buttons for the a[[i]] type parameters set up section of LineshapeEditor. A brief description of the definition of new lineshapes can be found in the How it works section of this chapter.
Edit on this input field the name of the lineshape b[[i]] parameter. This name will be used for other tables as headers and can be used on the PlotWindow to label the peaks.
Edit on this input field the name of the lineshape b[[i]] parameter symbol. This symbol can be used for other user defined formulas or for the PlotWindow to label the peaks.
"Derivatives set up"section of the LineshapeEditor system In the section of the LineshapeEditor named Derivatives set up you can set up for the lineshape - fin the case that Mathematica cant calculate automatically them - the formulas for each derivative as shown on the next figure.
The following section explains the header elements and buttons for the Derivatives set up section of LineshapeEditor. A brief description about the definition of new lineshapes can be found in the How it works section of this chapter.
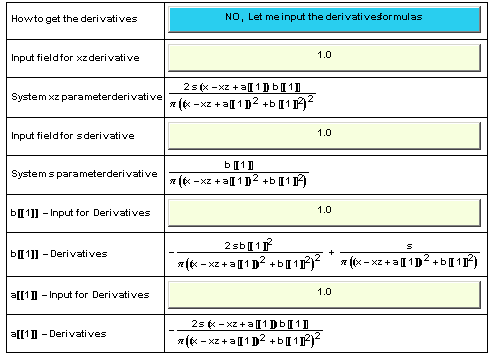
Click this button to switch between the two basic derivative input mode of Symath. In the first mode Symath will calculate using Mathematica the derivatives, in the second mode you can input the formulas for each derivative. In the second case there are in the table as many rows with derivative input fields as many derivatives the lineshape formula has.
Type in this input field of the lineshape xz parameter derivative formula.
In this row the xz parameter derivative is shown as calculated by Mathematica or interpreted from the user input. The formula shown in this row will be used in the fitting procedure
Type in this input field the lineshape s parameter derivative formula.
In this row the s parameter derivative is shown as calculated by Mathematica or interpreted from the user input. The formula shown in this row will be used in the fitting procedure
Type in this input field the lineshape b[[i]] derivative formula.
In this row the b[[i]] parameter derivative is shown as calculated by Mathematica or interpreted from the user input. The formula shown in this row will be used in the fitting procedure
Type in this input field the lineshape a[[i]] derivative formula.
In this row the a[[i]] parameter derivative is shown as calculated by Mathematica or interpreted from the user input. The formula shown in this row will be used in the fitting procedure "PeakSearch system guess functions set up"section of the LineshapeEditor system In the section of the LineshapeEditor named PeakSearch system guess functions set up you can set up the lineshape estimating functions for the SearchSystem as shown on the next figure.
The following section explains the header elements and buttons for the PeakSearch system guess functions set up section of LineshapeEditor. A brief description of the definition of new lineshapes and about the search system can be found in the How it works section of this chapter.
Click this button to select the SearchSystem type. Symath implements a very clever lineshape independent PeakSearch system. The user selects using this button a SearchSystem procedure implemented in Symath. In present version 1.0.2 the SearchSystem type "Search for minima/maxima" is implemented. In further versions other searching procedures can be implemented as zero crossing search etc... Using the information found by the searching procedure and the user defined estimating functions parameter estimates can be calculated for any lineshape. Depending on the SearchSystem type you select with this button you have to define your guess function formulas. Each SearchSystem type needs another set of guess functions. You can set up the guess functions for all SearchSystem types or only for the SearchSystem type that you intend to use.
In this row the parameters found by the SearchSystem are displayed. You can use the parameters shown here - and only these- in your user defined guess functions. The data displayed in this row changes any time you change the SearchSystem type.
In this row the estimating function for the xz parameter can be edited. This function must estimate using the parameters found by the SearchSystem ( depending on the SearchSystem type ) the xz parameter for a peak detected by the SearchSystem.
In this row the guess function for the xz parameter as interpreted by Mathematica is shown.
In this row the SearchSystem estimating function for the s parameter can be edited. This function must estimate using the parameters found by the SearchSystem ( depending on the SearchSystem type ) the s parameter for a peak detected by the SearchSystem.
In this row the guess function for the s parameter as interpreted by Mathematica is shown.
In this row the estimating function for the b[[i]] type parameter can be edited. This function must estimate using the parameters found by the Symath search system ( depending on the search type ) the b[[i]] parameter for a peak detected by the SearchSystem. The search system will not return as many parameter as parameters the lineshape formula has so that some parameters ( usually the b[[i]] type ones as the lineshape width ) will remain undetermined. In such cases a fixed numeric default parameter value can be used or a formula containing only the parameter itself, in which case the default parameter value that the user can edit on the WorkSheet LineshapeList table ( with show attributes switched On ) will be used for each detected peak.
In this row the estimating function for the b[[i]] parameter as interpreted by Mathematica is shown.
In this row the estimating function for the a[[i]] type parameter can be edited. This function must estimate using the parameters found by the SearchSystem ( depending on the SearchSystem type ) the a[[i]] parameter for a peak detected by the SearchSystem. The SearchSystem will not return as many parameters as parameters the lineshape formula has so that some parameters ( usually the b[[i]] and the a[[i]] type ones ) will remain undetermined. In such cases a fixed numeric default parameter value can be used or a formula containing only the parameter itself, in which case the default parameter value that the user can edit on the WorkSheet LineshapeList table ( with show attributes switched On ) will be used for each detected peak.
In this row the estimating function for the a[[i]] type parameter as interpreted by Mathematica is shown.
Processing buttons of the LineshapeEditor system The processing buttons just after the LineshapeEditor sections are shown on the next figure. The following section explains the processing buttons at the end of the LineshapeEditor. A brief description of the definition of new lineshapes can be found in the How it works section of this chapter.
Click this button to save the current edited lineshape in the LineshapeDatabase. Only a copy of the lineshape is edited on the LineshapeEditTables and ONLY if you click this button are the changes transferred to the LineshapeDatabase ( to the copy present in the computers memory and not to the one present on the disk ). If your lineshape has errors ( as parameters others as than xz,s,n,b[[i]] and a[[i]] ) Symath will not save the changes, will ask you to correct the errors found.
Click this button if you want to cancel the current edited lineshape. The sections with the LineshapeEdit Tables will than be deleted from the LineshapeWindow.
Click this button to display a help table for the LineshapeEditor window. An additional table will be inserted with a short description of all table headers and buttons. A brief description of the lineshape selection and edit procedure can be found in the "Lineshape set up" section of the manual. © 2007 Dr.Georg Ch. Mellau |


![{{Nr, Add * . pek, Name, FormulaSymbol, Dimension, Type, File, Edit, Delete, New}, {1, Add, ... Â Â Â Â 1/(b[[1]]^2 + (x - xz)^2), 3, Input, Default2 . lsp, Edit, Delete, New}}](../../HTMLFiles/index_38.gif)
![{{ 0.5, ÎX_fit, The range around the peak where the spectrum is fitted .}, {sLog[2]/ ... xz))/b[[1]])^2), Lineshape 1, Doppler , lineshape function that ca be used to fit the peaks .}}](../../HTMLFiles/index_42.gif)
![{{Nr, Add * . pek, Name, FormulaSymbol, Dimension, Type, File, Edit, Delete, New}, {1, Add, ... Â Â Â Â 1/(b[[1]]^2 + (x - xz)^2), 3, Input, Default2 . lsp, Edit, Delete, New}}](../../HTMLFiles/index_72.gif)
![{{ 0.5, ÎX_fit, The range around the peak where the spectrum is fitted .}, {sLog[2]/ ... ^2 + (x - xz)^2), Lineshape 2, Lorentz , lineshape function that ca be used to fit the peaks .}}](../../HTMLFiles/index_82.gif)
![{{Nr, Add * . pek, Name, FormulaSymbol, Dimension, Type, File, Edit, Delete, New}, {1, Add, ... Â Â Â Â 1/(b[[1]]^2 + (x - xz)^2), 3, Input, Default2 . lsp, Edit, Delete, New}}](../../HTMLFiles/index_114.gif)
![{{Dimension, 4}, {Formula Symbol, sb[[1]]/Ï?1/(b[[1]]^2 + (a[[1]] + x - xz)^2)}, {Use F ... rs, 1}, {xz parameter defined, True}, {s parameter defined, True}, {n parameter defined, False}}](../../HTMLFiles/index_143.gif)
![{{Dimension, 4}, {Formula Symbol, sb[[1]]/Ï?1/(b[[1]]^2 + (a[[1]] + x - xz)^2)}, {Use F ... rs, 1}, {xz parameter defined, True}, {s parameter defined, True}, {n parameter defined, False}}](../../HTMLFiles/index_173.gif)
![{{b[[1]] Description, Lorentz half width}, {b[[1]] Symbol, b_L}}](../../HTMLFiles/index_183.gif)
![{{a[[1]] Description, Îx shift for all peaks}, {a[[1]] Symbol, Îx}}](../../HTMLFiles/index_193.gif)
![{{How to get the derivatives, YES, calculate automatically derivatives with D[] }, {System ... ã? 1 ã?)/(Ï? ((x - xz + a ã? 1 ã?)^2 + b ã? 1 ã?^2)^2)}}](../../HTMLFiles/index_202.gif)
![{{SearchSystem type, Search for local Maxima}, {Parameters found by the SearchSystem, x - l ... ating function, a[[1]]}, {a[[1]] parameter estimating function (System), a ã? 1 ã?}}](../../HTMLFiles/index_222.gif)


 Force loading " width="156" height="70" style="vertical-align:middle" />


![{{Nr, Add * . pek, Name, FormulaSymbol, Dimension, Type, File, Edit, Delete, New}, {1, Add, ... /2)/b[[1]] ï^(-Log[2] ((x - xz)/b[[1]])^2), 3, Input, Default2 . lsp, Edit, Delete, New}}](../../HTMLFiles/index_39.gif)
![FormulaSymbolsLog[2]/Ï?^(1/2)/b[[1]] ï^(-Log[2] ((x - xz)/b[[1]])^2)](../../HTMLFiles/index_43.gif)

![{{Dimension, 4}, {Formula Symbol, sb[[1]]/Ï?1/(b[[1]]^2 + (a[[1]] + x - xz)^2)}, {Use F ... rs, 1}, {xz parameter defined, True}, {s parameter defined, True}, {n parameter defined, False}}](../../HTMLFiles/index_58.gif)
![Formula Symbolsb[[1]]/Ï?1/(b[[1]]^2 + (a[[1]] + x - xz)^2)](../../HTMLFiles/index_60.gif)
![Lineshape Formulasb[[1]]/Ï?1/(b[[1]]^2 + (a[[1]] + x - xz)^2)](../../HTMLFiles/index_621.gif)

![{{b[[1]] Description, Lorentz half width}, {b[[1]] Symbol, b_L}}](../../HTMLFiles/index_711.gif)
![{{a[[1]] Description, Îx shift for all peaks}, {a[[1]] Symbol, Îx}}](../../HTMLFiles/index_74.gif)
![{{How to get the derivatives, YES, calculate automatically derivatives with D[] }, {System ... ã? 1 ã?)/(Ï? ((x - xz + a ã? 1 ã?)^2 + b ã? 1 ã?^2)^2)}}](../../HTMLFiles/index_77.gif)
![How to get the derivativesYES, calculate automatically derivatives with D[] NO, Let me input the derivatives formulas](../../HTMLFiles/index_78.gif)


![b[[1]] - Derivatives -(2 s b ã? 1 ã?^2)/(Ï? ((x - xz + a ã? 1 ã? ... 14; 1 ã?^2)^2) + s/(Ï? ((x - xz + a ã? 1 ã?)^2 + b ã? 1 ã?^2))](../../HTMLFiles/index_84.gif)
![a[[1]] - Derivatives -(2 s (x - xz + a ã? 1 ã?) b ã? 1 ã?)/(Ï? ((x - xz + a ã? 1 ã?)^2 + b ã? 1 ã?^2)^2)](../../HTMLFiles/index_86.gif)
![{{SearchSystem type, Search for local Maxima}, {Parameters found by the SearchSystem, x - l ... ating function, a[[1]]}, {a[[1]] parameter estimating function (System), a ã? 1 ã?}}](../../HTMLFiles/index_87.gif)
![Input s estimating function (y Ï?)/b[[1]]](../../HTMLFiles/index_921.gif)